I live in Iowa, but I live for Ste. Genevieve, Missouri's Rural Heritage Day. Herein you'll find all the fabric fondling, pattern hoarding, seam ripping, hair pulling, and joy that goes along with recreating dresses from times past. Welcome!
Monday, March 18, 2013
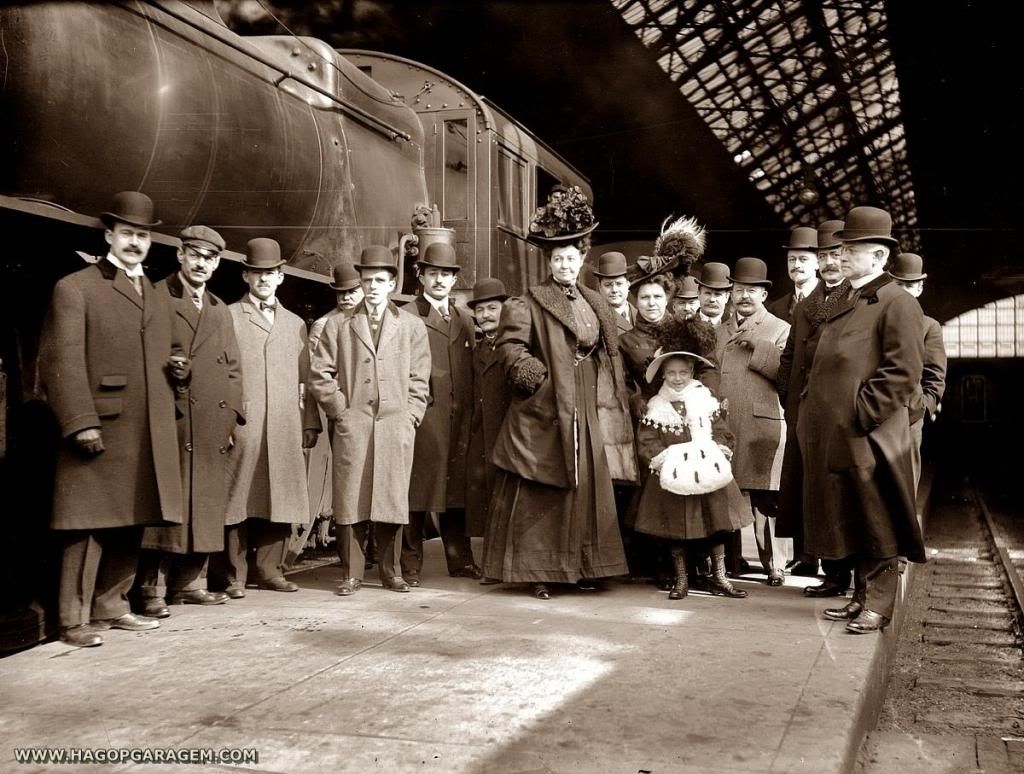
I am obsessed with this picture:
This is from the website hagopgaragem.com (obvs!), that I first found at the TrulyVictorian.com bulletin board as posted by Miss Cindy.
What I love about this photo is the grand lady at the center.
~~~
I am 5' 10.5" in my stockings. In my heeled Victorian boots I'm around 6'1''. I'm among the tallest in the room in regular life and I've always shied away from tall late Victorian hats on account of I'd be, like, seven feet tall with the hat.
No longer! This lady is as tall or taller than every gentleman present, and that didn't stop her from donning a marvel of the milliner's trade.
I don't know where this phobia of a tall hat came from. I never shy away from quite high heels despite being taller than my husband. (He doesn't mind, I like scoop neck blouses and my heels put the most picturesque areas right at eye level.)
Anyway...
I have a feeling there is a blossom-laden late Victorian hat in my future! :D
More avoiding of things that I should be doing. Hat? Or parasol? Place your bets! Place your bets!
'Hat' pays five to one!
So, I was cutting patterns for miscellaneous bonnets for the costume closet for Ste. Gen's Victorian Christmas Walk when an irresistible urge for a fanchon style bonnet took root. Fanchon bonnets followed spoon bonnets (post to come!) in the fashion timeline and were popular toward the end of the American Civil War.
Civil War + You Tube = Getting sucked into Gone With The Wind movie clips.
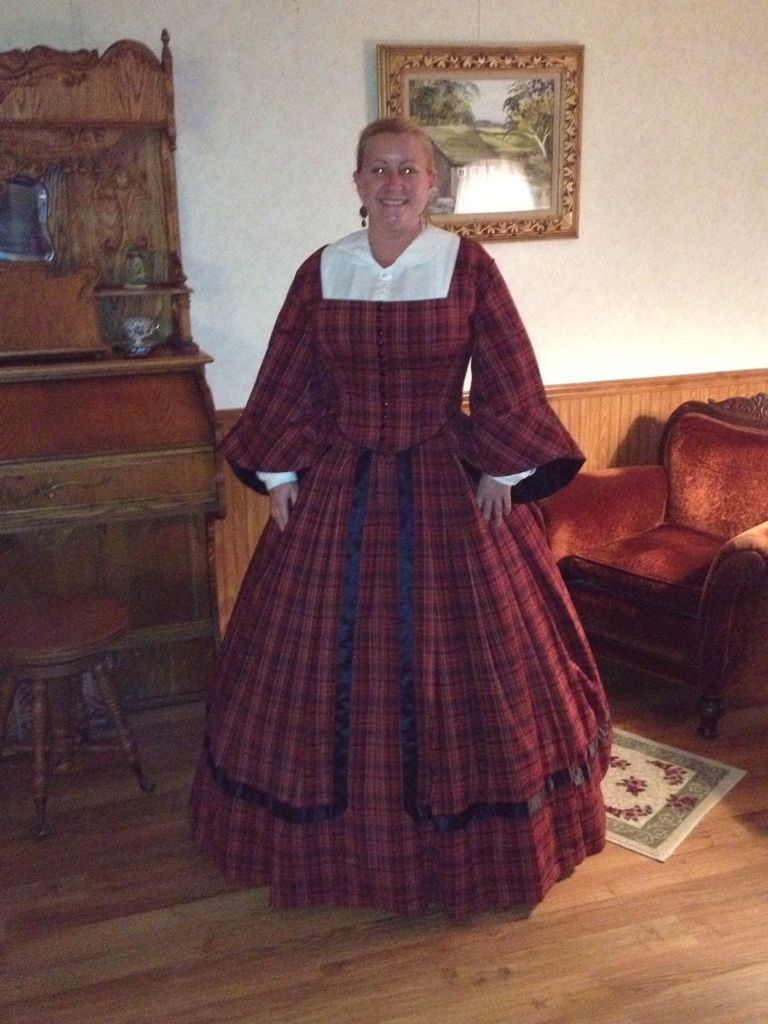
The *very* last place to go for CW costume research is Gone With The Wind. But what the heck, we can withstand a GWTW bonnet can't we? Of course we can! I never made a proper topper to complement Stephanie's 1865 Red Plaid frock.
Hey lookie, I've got some red cotton velvet scraps and some red silk! Do you know what that sound fabric is Mr. Anderson? That is the sound fabric of inevitability.
Remember this scene?
Ridiculously adorable bonnet. Away we go!
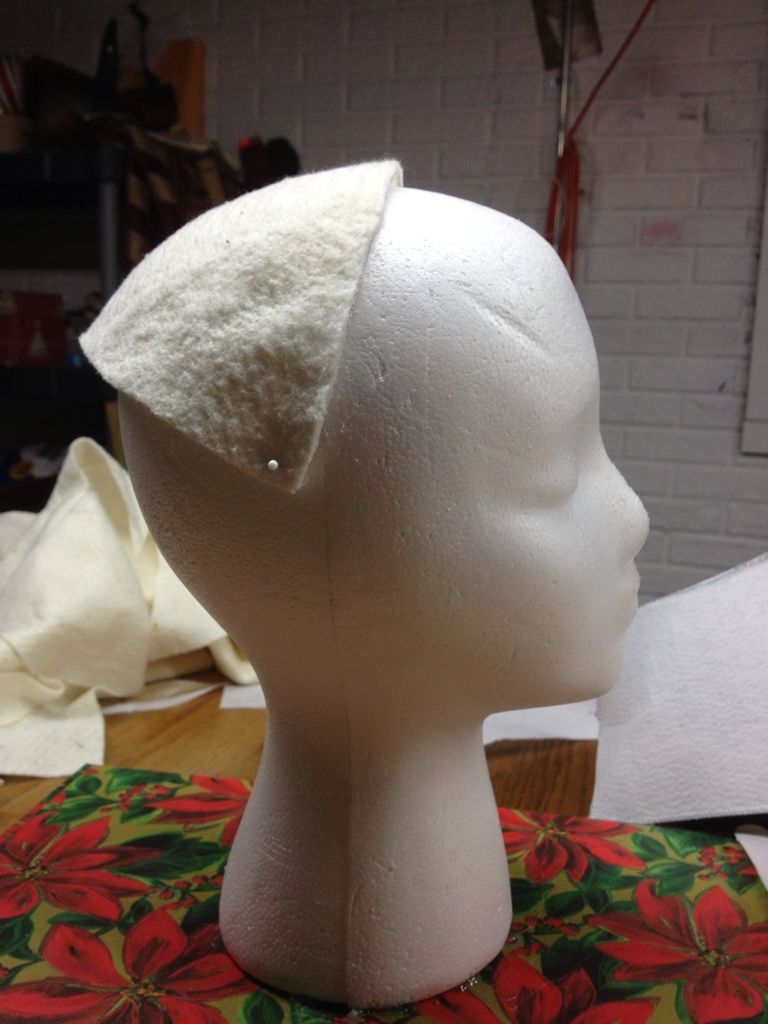
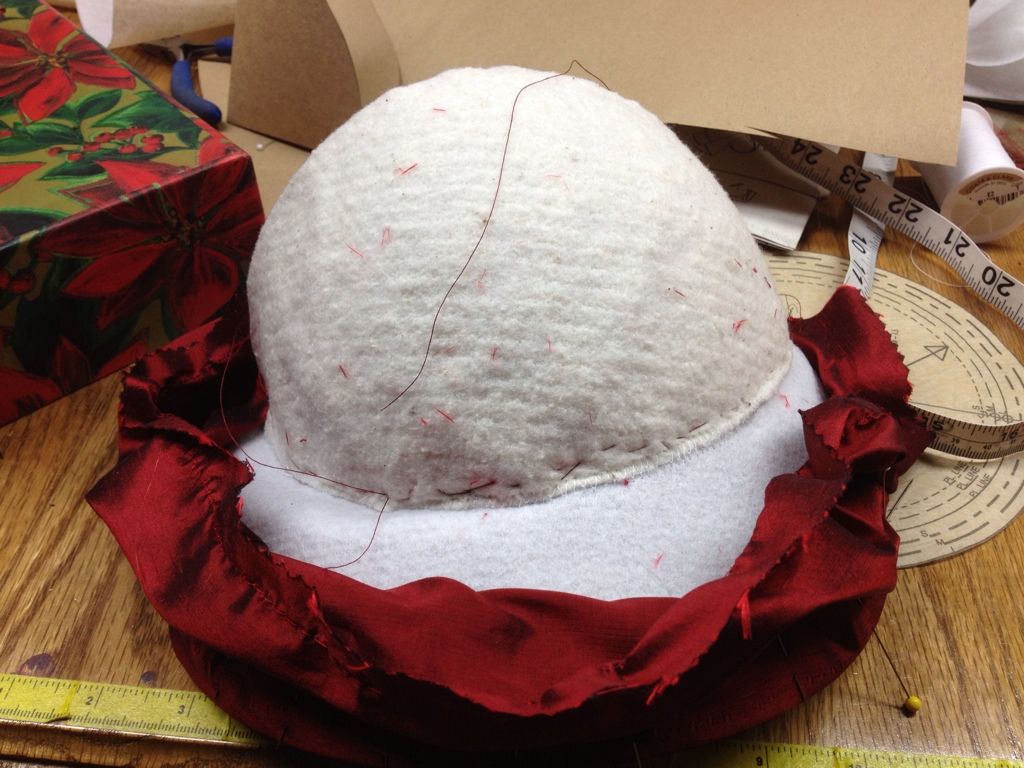
I like Pellon Peltex for hats, but for this bonnet I needed a rounded form for the crown, so I used wet buckram formed over FredMeyer*, my styro-head, for part of the bonnet frame. Totally forgot to take pictures of that part. Wet the buckram, stretch smooth over the curve, pin tight, wait for it to dry. Draw a marquise shape, cut, wire, add some cotton quilt batting, et voila!
I derped around with brown paper to get the right curves for the brim. Looking at extant fanchon bonnets, the brims are no where near that angle. "Fiddle-dee-dee," someone once said.
I cut the brim of Peltex, wired it, and stitched it to the crown.
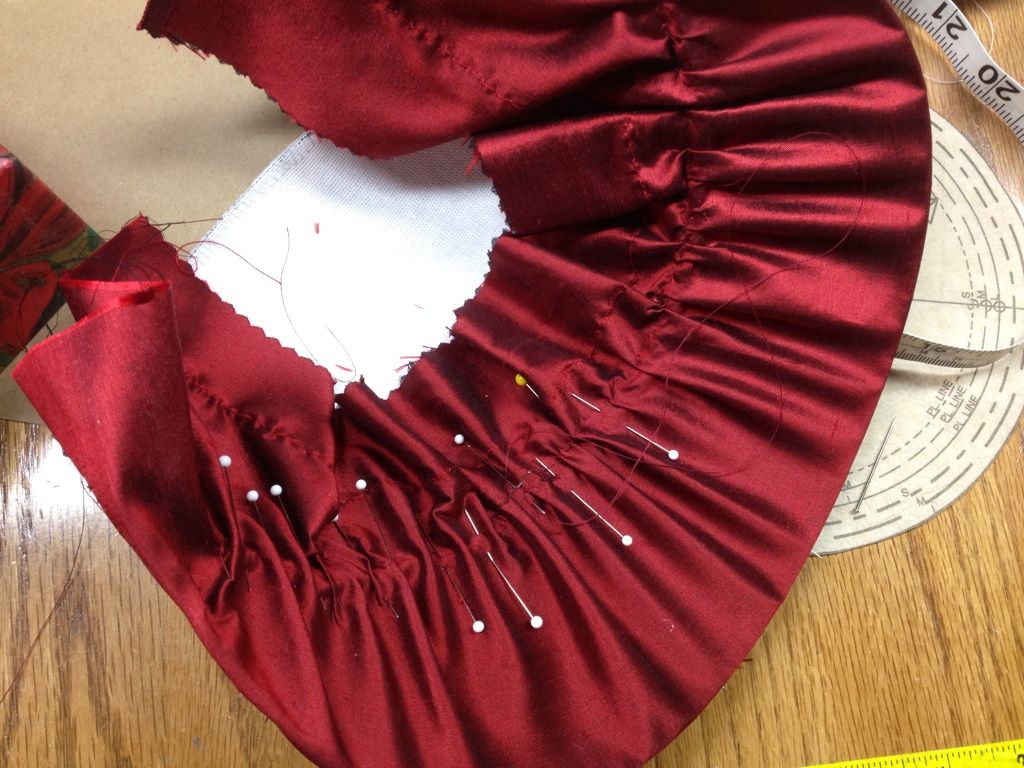
A scrap of silk of sufficient width to cover the brim is pinned in place.
I adjusted the fullness by hand...
...and hand stitched in place.
The topside gathers I adjusted similarly and hand stitched in place.
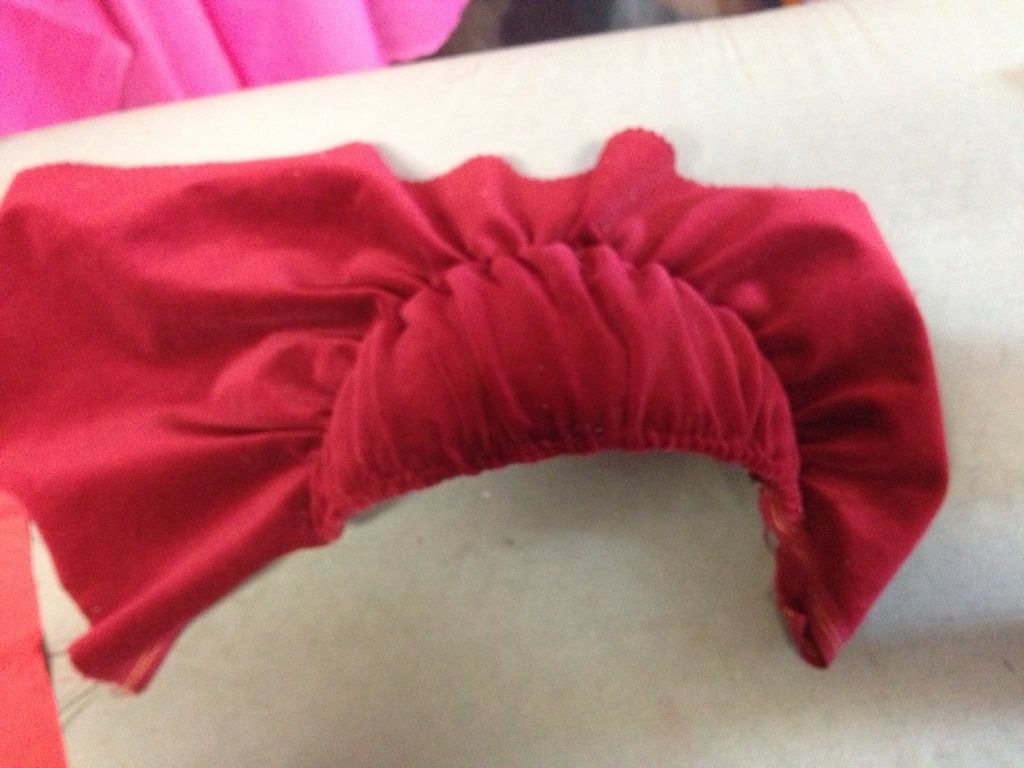
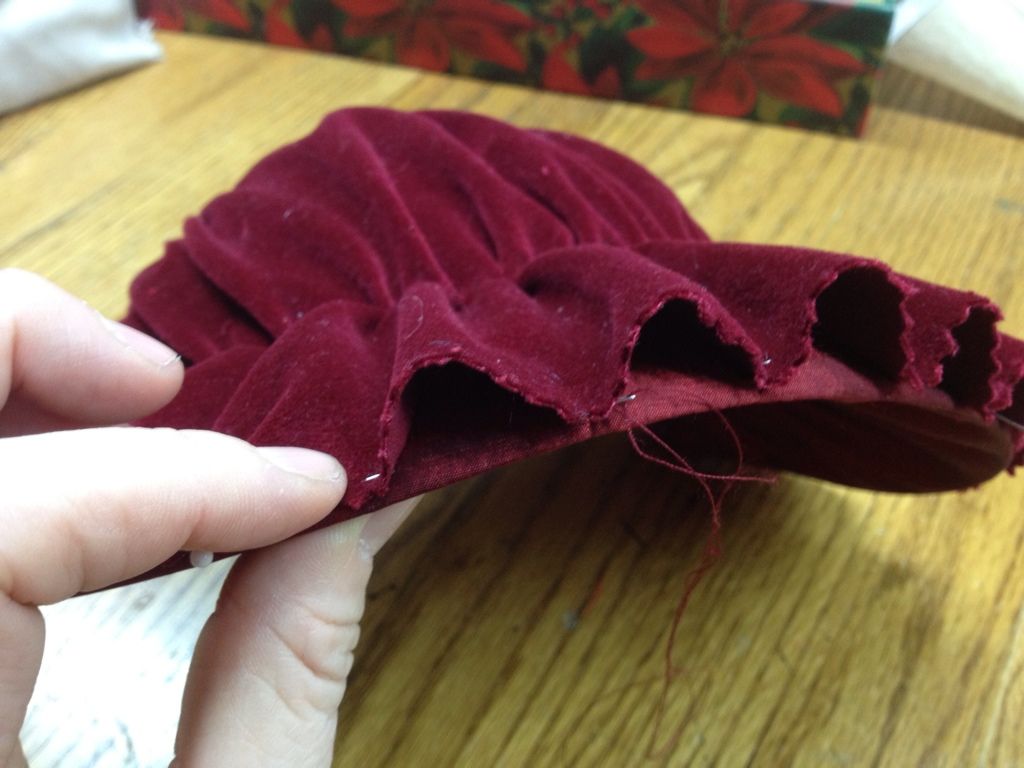
The crown and brim topside are to be covered in the cotton velvet. I took advantage of a selvedge edge here. I pinned the scrap selvedge edge roughly in place at the crown back edge (not shown), and made some chalk marks at the crown/brim seam. I stretched out the line, ran a long machine stitch at the extended chalk line and also at the selvedge to gather the velvet.
The excess at the brim forms a ruffle.
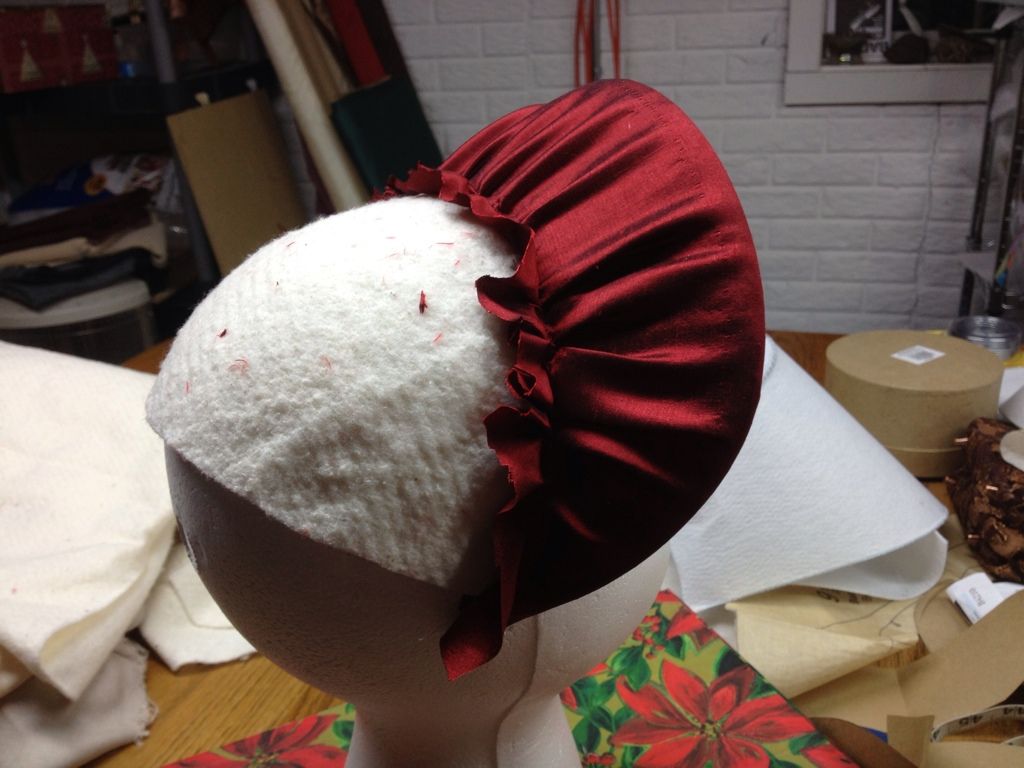
Hand-stitched at the front and back of the crown. I should mention here that there was not a single drop of glue--hot, solvent, or otherwise--used in this hat. I luvs me some Beacon's Fabri-Tac but there never seemed to be a need for adhesives with this project.
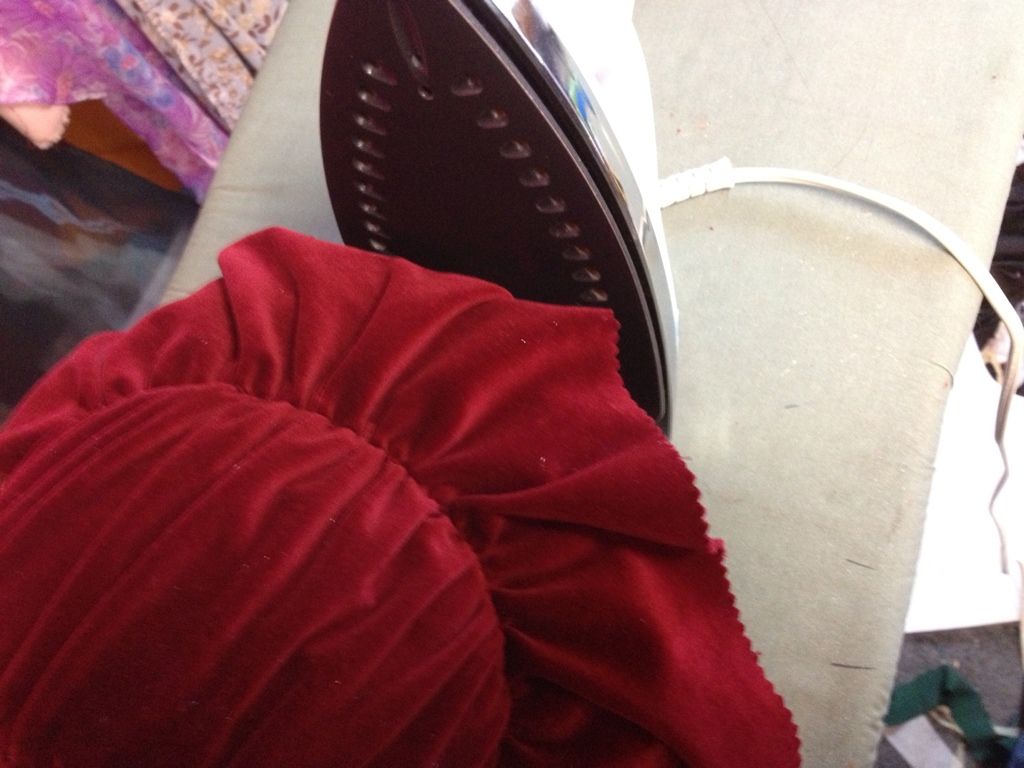
I used the iron to mark the velvet where it extended past the brim.
Velvet marks very easily. I used the marks I made as a guide to pink the edge.
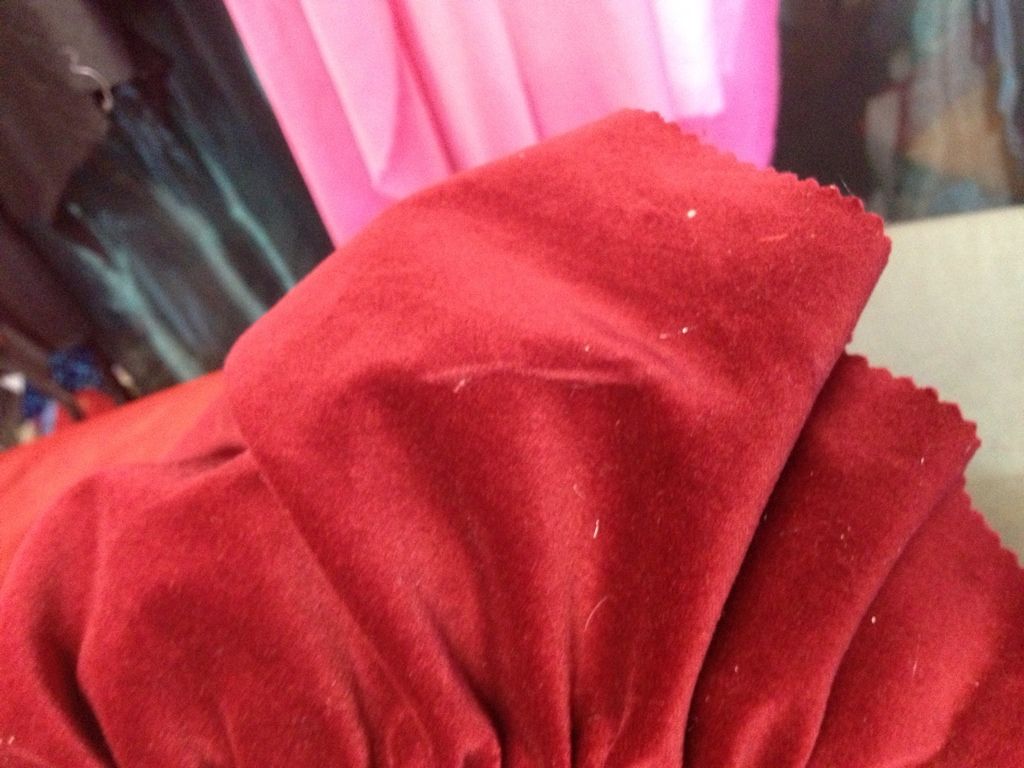
After adjusting the fullness I tacked each ruffle down invisibly. The velvet really absorbs hand stitches.
I slid under the silk to get between ruffles.
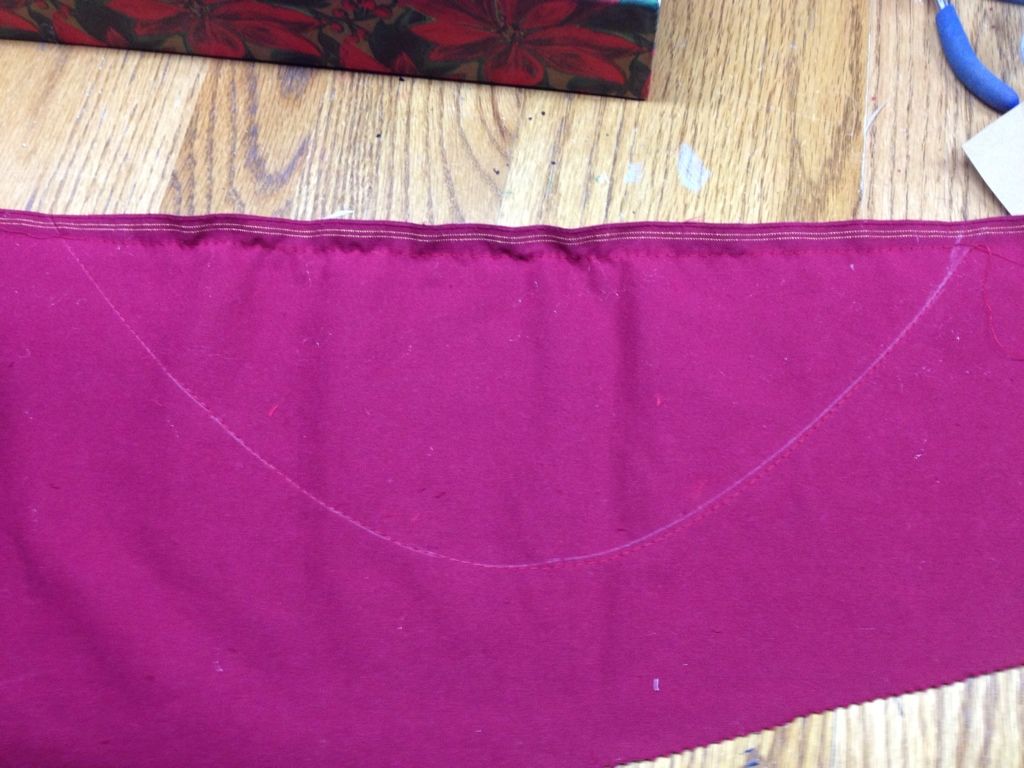
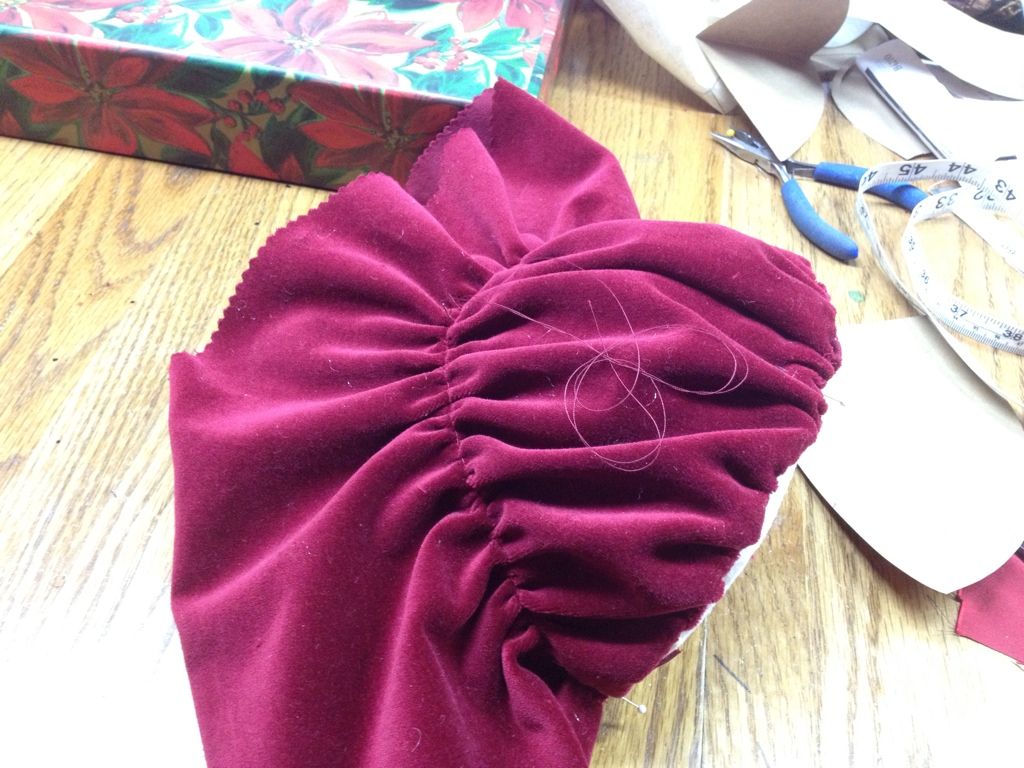
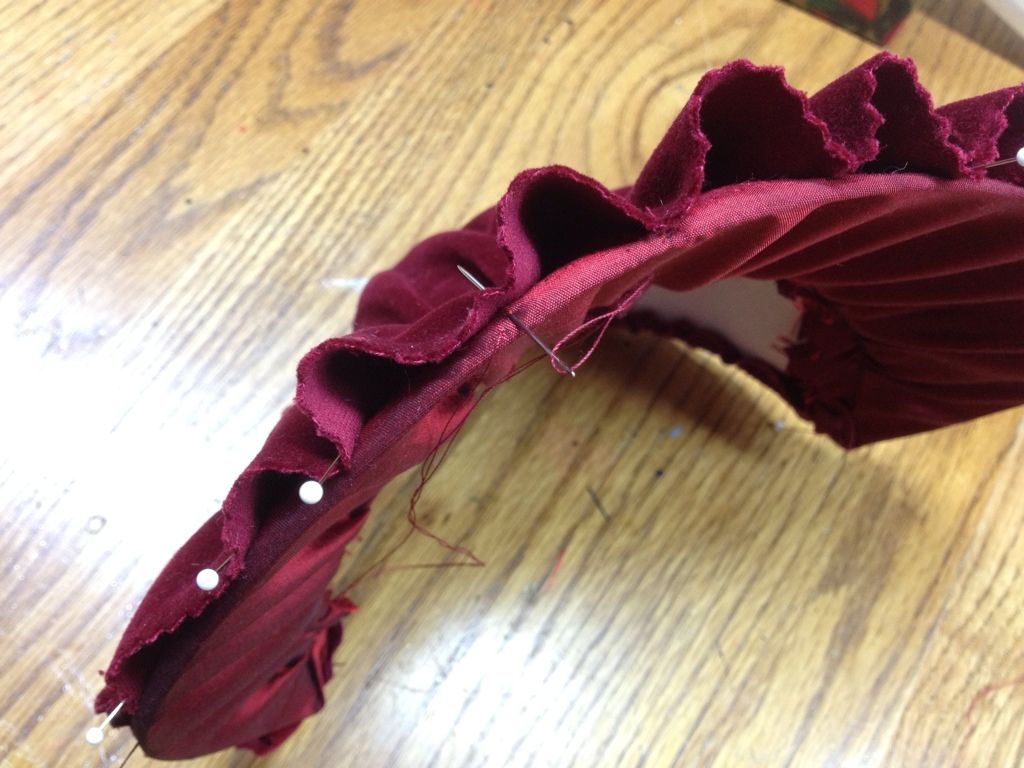
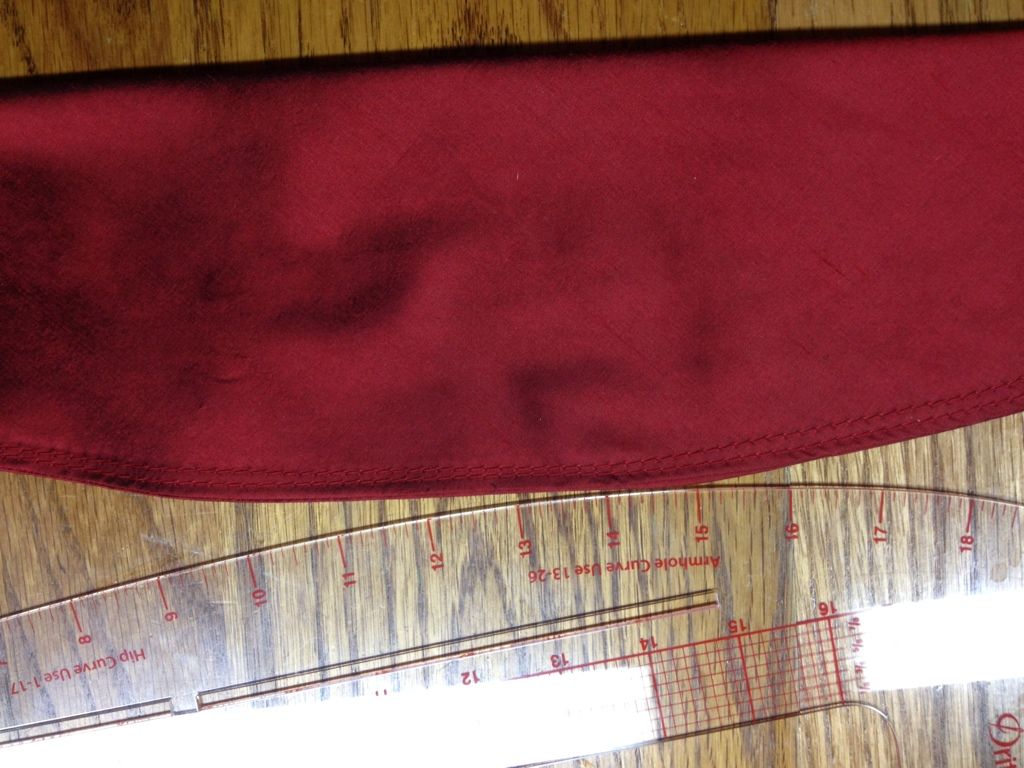
I'm approaching the end-zone here so I got excited and forgot to take pictures. For the bavolet, or curtain, at the back of the crown I folded a square of the silk to get a bias edge. I measured the back edge of the crown and cut a pattern piece in a curve at roughly double the length of the back edge. The straight edge of the pattern is on the bias fold.
I seamed the raw curved edges and turned the piece, and ran a gathering stitch on the curved edge. That was then hand stitched to the back edge of the bonnet crown.
I used a scrap of black silk for a lining. I cut a marquise shape a little bigger than the crown and folded the edges in. Gathering stitches in rows across the piece help control the fullness. The edges are whipstitched in place.
A dyed ostrich plume is the only decoration. Feathers can be curled in various ways. I often use scissors to curl the fronds like Christmas ribbon, but in this case I used a small barreled curling iron on the fronds. The center shaft I crimped along the length with the edge of my scissors against my thumb. You can get quite a spiral going depending on how close you space each crimp. For this feather I used a quarter inch or so spacing.
The ties are gathered at the end, gathered about three inches further down, folded over to form a pouf, and then stitched in place.
*FredMeyer:
We visited Alaska last summer and a familiar grocery store chain there is called Fred Meyer, like Hy-Vee in Iowa, or Winn-Dixie in Lousiana. For whatever teenage reason, my children named the styro-head FredMeyer. Don't ask questions, trying to delve into the mind of a teenager is pointless.
For my friend Andrea, who just learned to do a welt pocket.
Can you find the single welt pocket?
There it is!
The pattern matches at the bottom pocket on the left side only due to the pocket crossing a fitting dart. You have to pick one side or the other. I wish I had more pictures of how I did this neat trick. It comes down to hunting through the scraps for a piece that matches the motif where the pocket is slashed open, cutting an overly large rectangle and fiddling the welt fold and seam allowances till you get the match. Hand baste, check the match, adjust if necessary. Math and obsessing for the win!
This was a man's vest for a mid-Victorian frock-coated ensemble from Heritage Day 2010 (I think).
Another little costuming bonbon with which to avoid the Petticoat of Doom: A dainty little purse!
Whilst neatening up the workshop I came across a purse frame I'd bought some time ago in a burst of enthusiasm after reading a tutorial on vintage style purse construction at the Madam's Mercantile page at BustleDress.com.
I rooted around the scraps box and found a piece of buff colored linen from a lady's motoring duster I made for last year's Rural Heritage Day. I backed it with a piece of woven cotton fusible interfacing for body and cut according to the pattern I'd made following the tutorial. It's lined with the green silk from the latest parasol scraps.
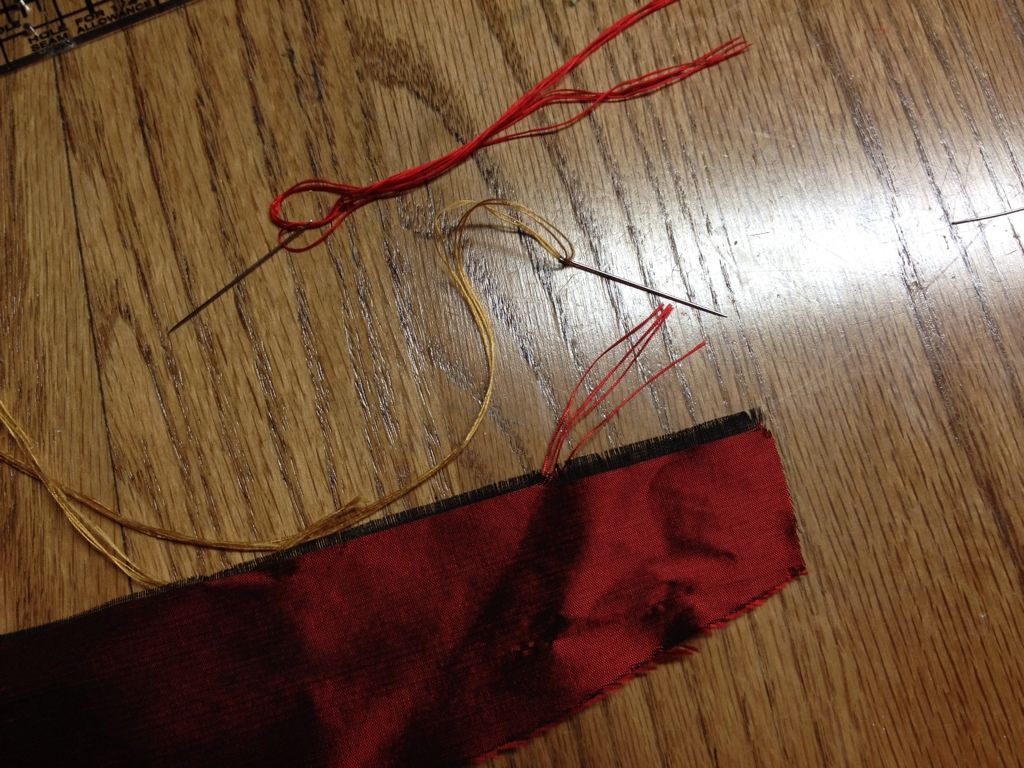
For decoration I decided to embroider. I stink at embroidery. I can execute with variable skill exactly two stitches: Stem, and Lazy Daisy. I recall what I really should be doing, (doom...DOOM!) and press on.
I have legit embroidery floss, but I use that for tailor's tacks in pattern marking. For this project at which I'm doomed (DOOM!) to stunning mediocrity, I used nigh-unmanageable threads frayed from suitably autumnal-colored silk scraps. Pro-tip TalentlessHack-tip: Spit helps tame the threads when they get fuzzy.
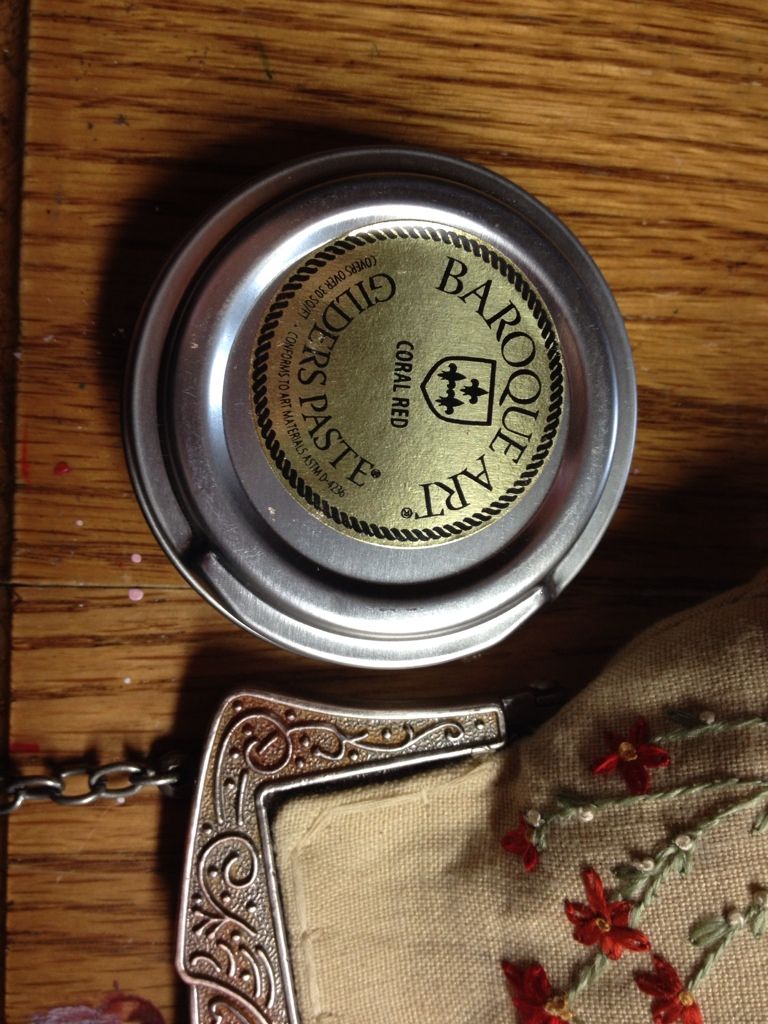
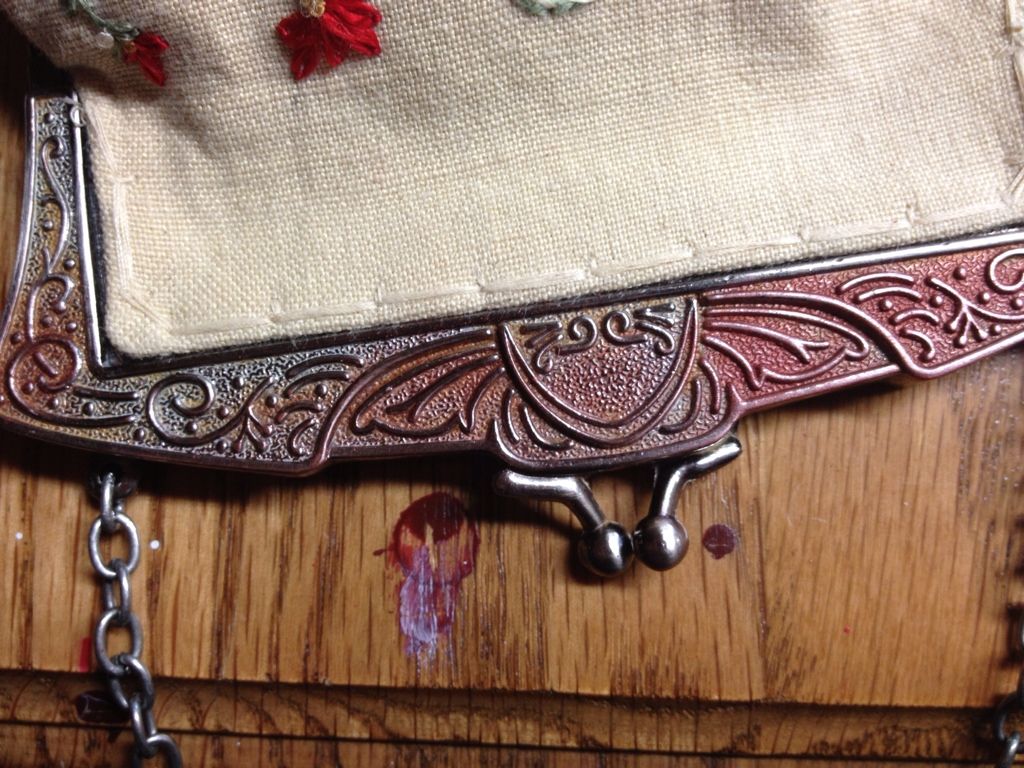
The purse frame I used had the distinction of having been painted with a sort of gold-ish automotive touch-up urethane at one time, but only on one side. I guess I just couldn't spare two more minutes for the other side and now the gold paint is dried in the little jar. :-/ There are only so many solvent vapors one can inhale before one's fingertips begin to tingle, so to disguise the less than complete removal of the gold I scrubbed in a bit of jewelry making gilders paste.
I use a toothbrush to scrub it in the crevices.
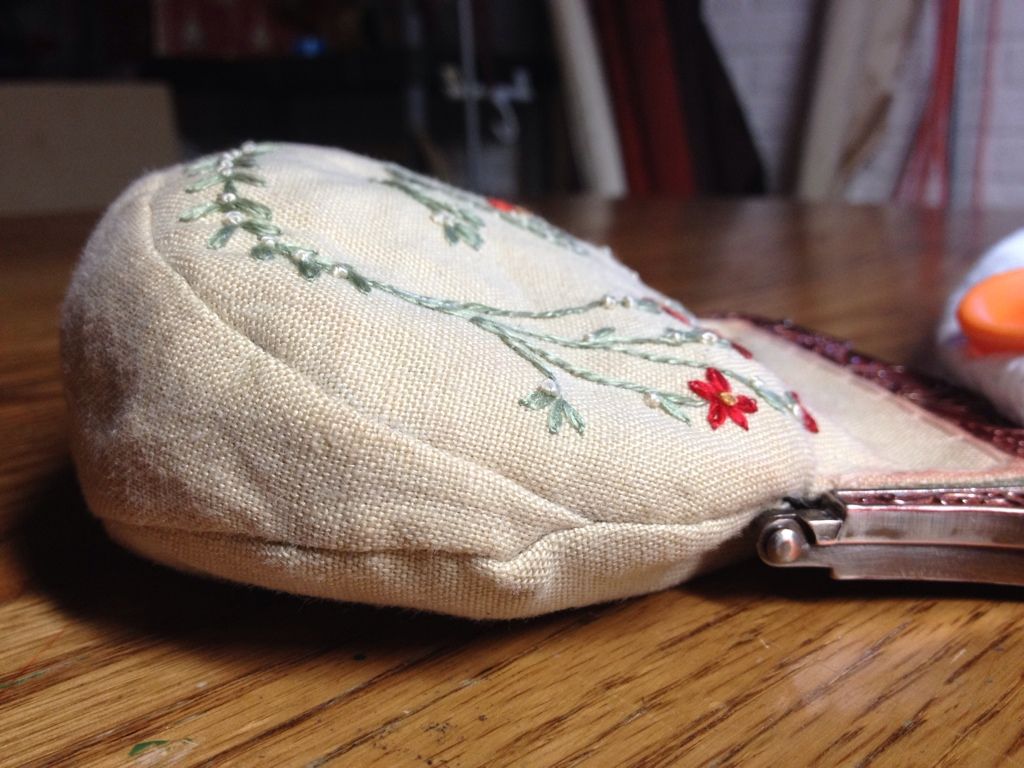
My purse is quite small, so I added a bottom panel. I like the plumpness.
So yeah, lack of center:
Perhaps I don't need meditation, just a little measuring.
Madam's tutorial is fantastic. Without the blight embroidery, this little bag would take maybe three hours to make. Next time I'll use some red velvet that I have in the scraps box.
The Corded Petticoat of Doom is still out there... Must. Avoid.
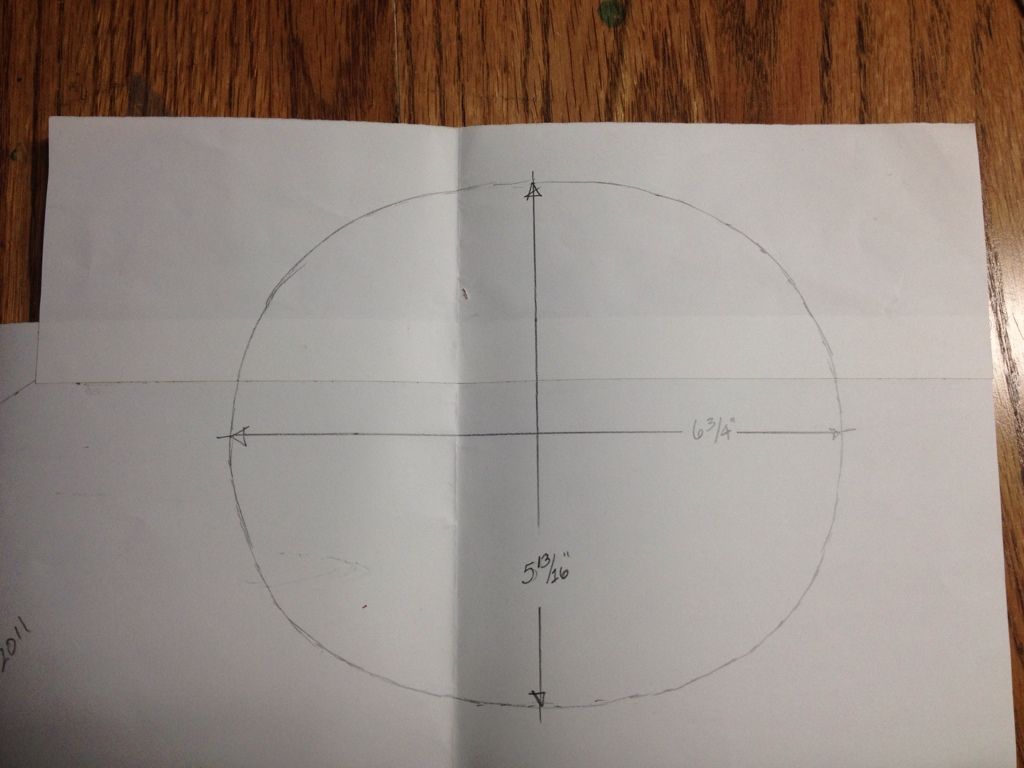
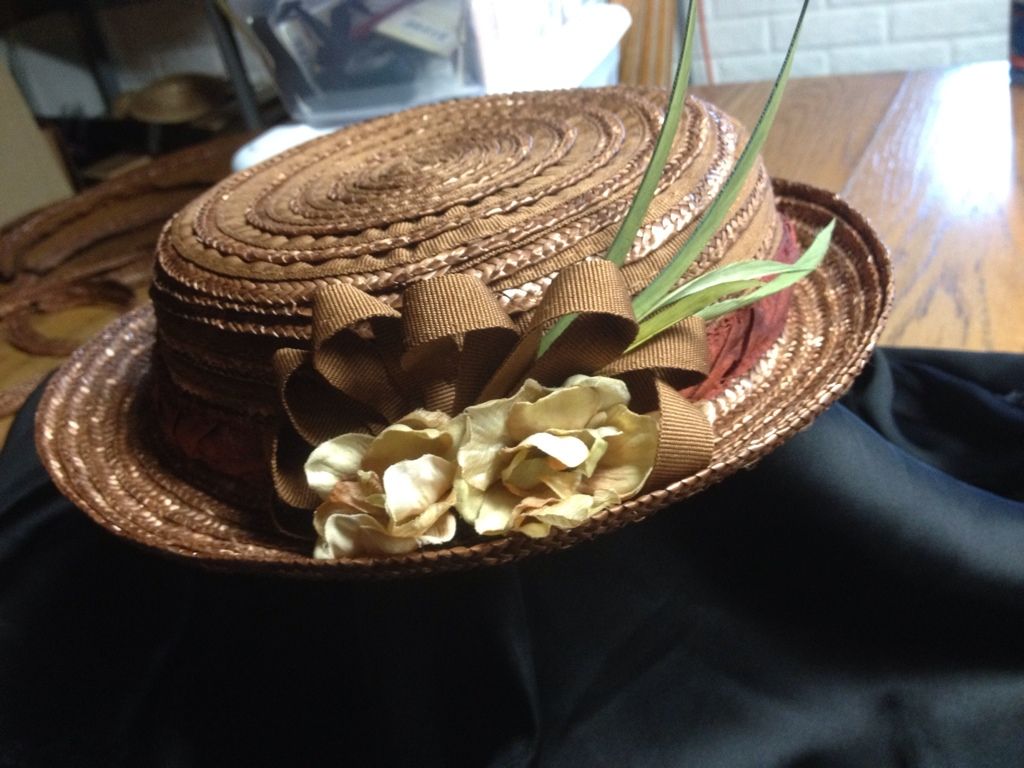
Do you know what's just as fun as a parasol? A hat! A cute little pork pie hat. I designed one last year for my younger daughter, to go with her 1871 girl's dress.
It turned out so well I immediately drew out the pattern so I wouldn't forget.
Yes, five and thirteen sixteenth inches is strange. I didn't measure when I was using paper to develop the buckram form, I just cut the shape.
Half of the crown side. Two and a half inch segments, five degrees off at each segment to make the curve.
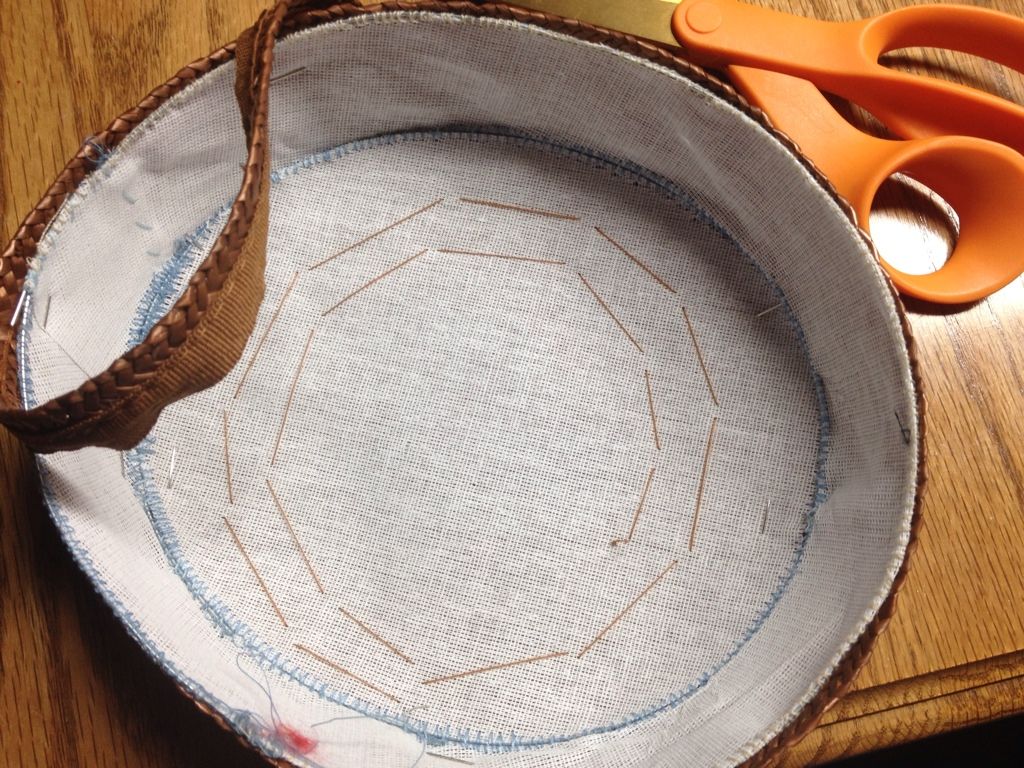
I use buckram I get at Hancock's. Most hat-making references tell you to double up for more stiffness, but I used single layers for this small hat. Wired and whipstitched together:
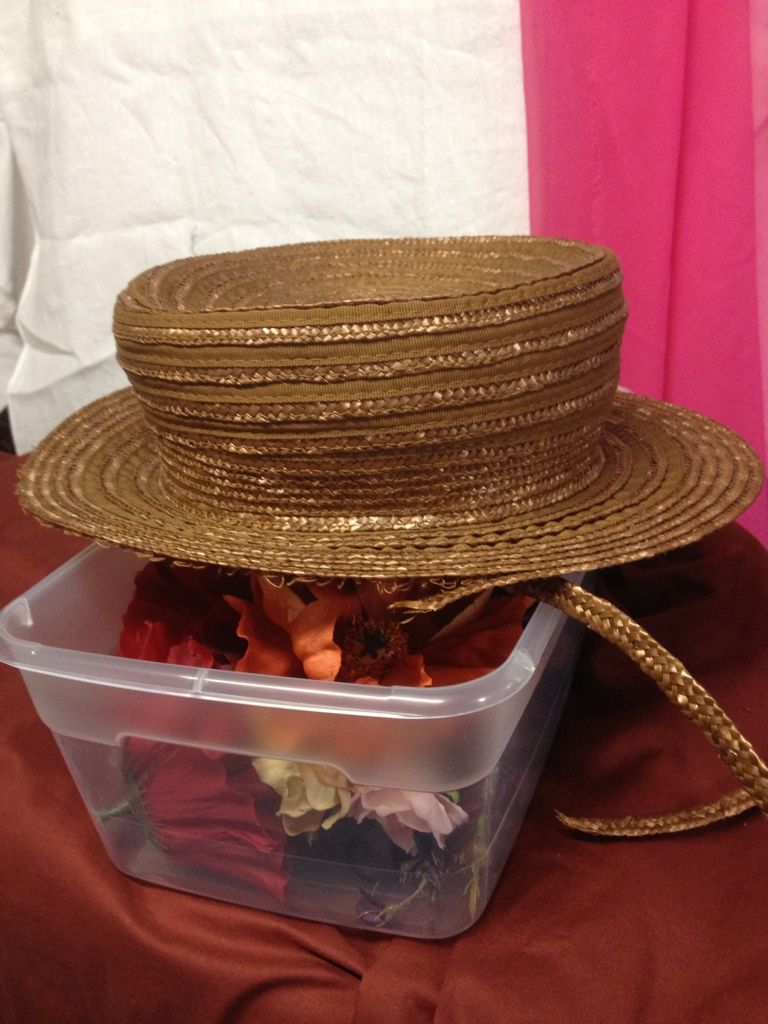
I use a machine zigzag stitch to wire the buckram and a strong thread to hand whipstitch. You can see the straw I'll use to cover it. I like to use bought hats that I can tear apart. Having the crown tip already shaped in the spiral is so convenient. The hat before I pulled it apart:
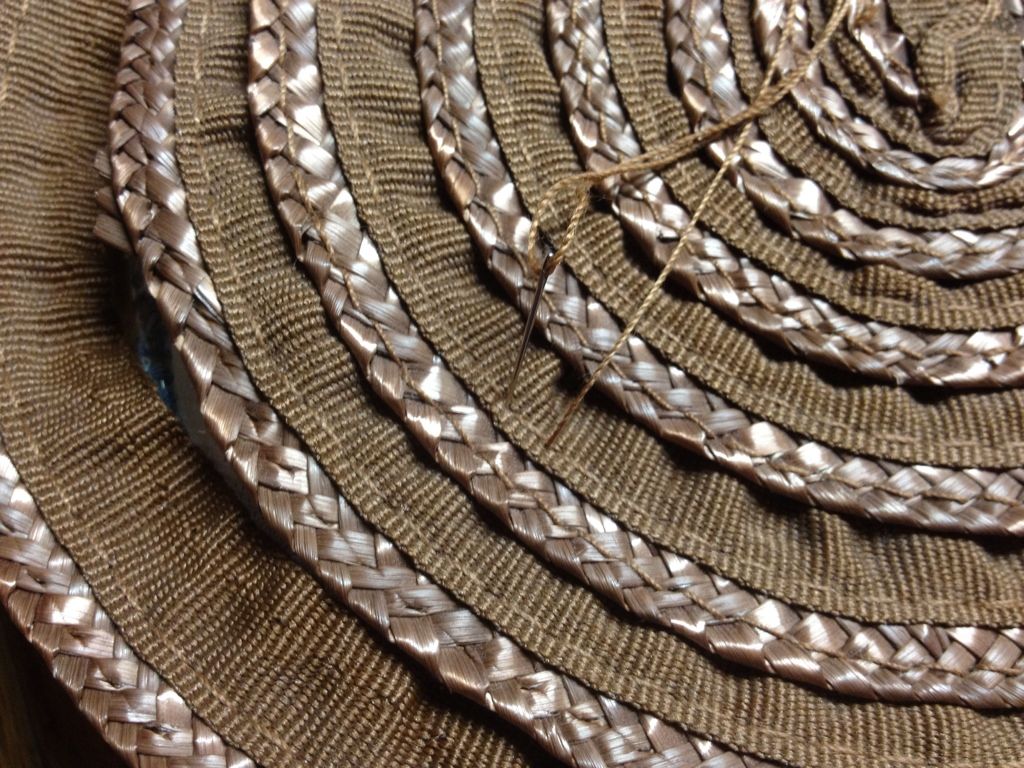
I got this one years ago from Hats by Leko, it's the fourth hat on that page. It's alternating straw and grosgrain ribbon. I pulled the stitching so I'd keep a straw and ribbon together. When I got a small enough circle of the crown tip, I started stitching that to the buckram frame.
I used the string I pulled out of the hat to sew it back together. It took some untangling and pressing to straighten out but it's a perfect color match. Hand stitching though heavy stuff like this is pretty tedious but the stitches don't need to be really close. It goes fast.
I pin it to the frame and hand stitch in rounds. When I get to the brim it gets trickier. It's a matter of changing the tension of the braid as you sew to get the brim to turn up; loose as I come off the bottom of the brim and tighter as the brim gets wider.
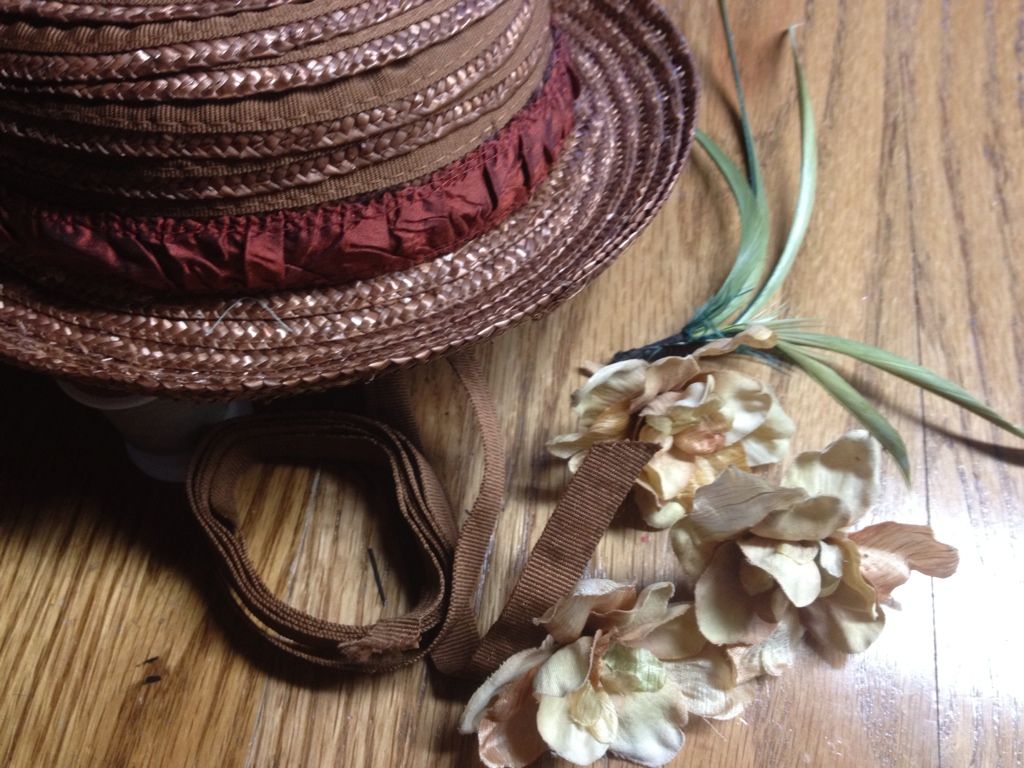
I rooted through my millinery supplies box for stuff to decorate with and found a feather I'd dyed for a winter fur bonnet that didn't color up enough. Lesson: Keep the mistakes, they may come in handy! I found a piece of red silk in the scraps box to ruche up for a hat band. Also some silk verbascums that I always have on hand. They're my favorite hat flower. One more great thing about tearing apart hats is that you can use the straw braid, or in this case the ribbon as decorative items.
Here's another hat I made from a similar Leko hat using that concept:
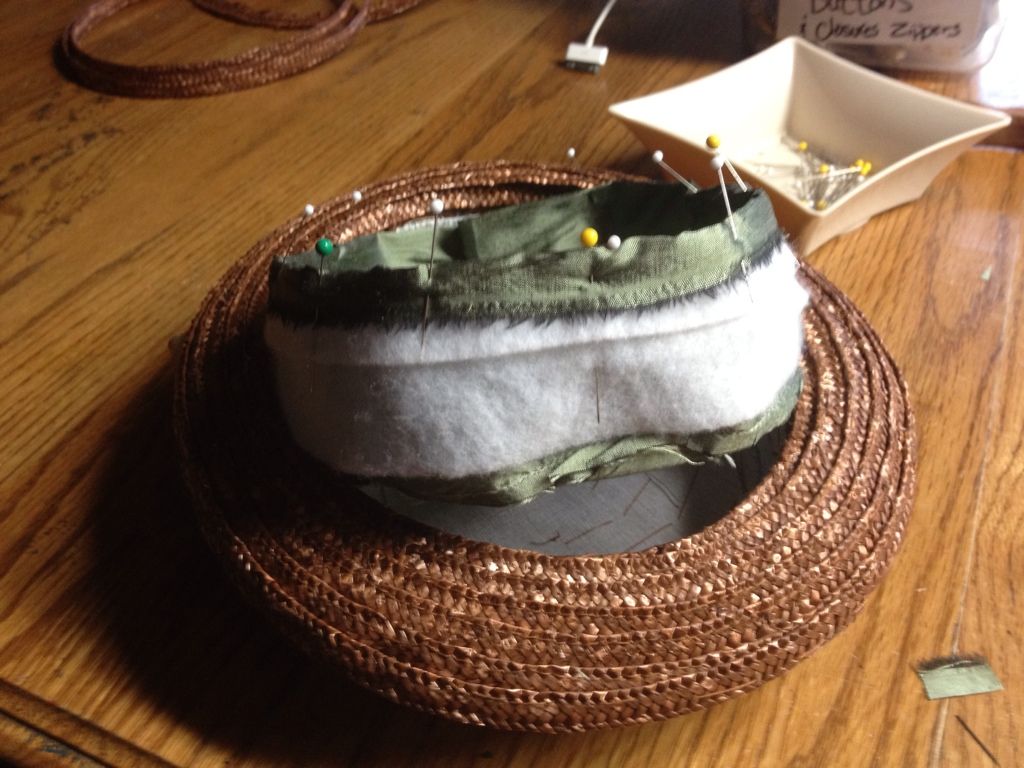
For the lining I used scraps from the green silk parasol. I cut the crown tip and sides from the buckram pattern, adding a three quarter inch seam allowance. I sewed only a quarter inch allowance, leaving the rest for ease in the lining. You may wonder what that white stuff is...
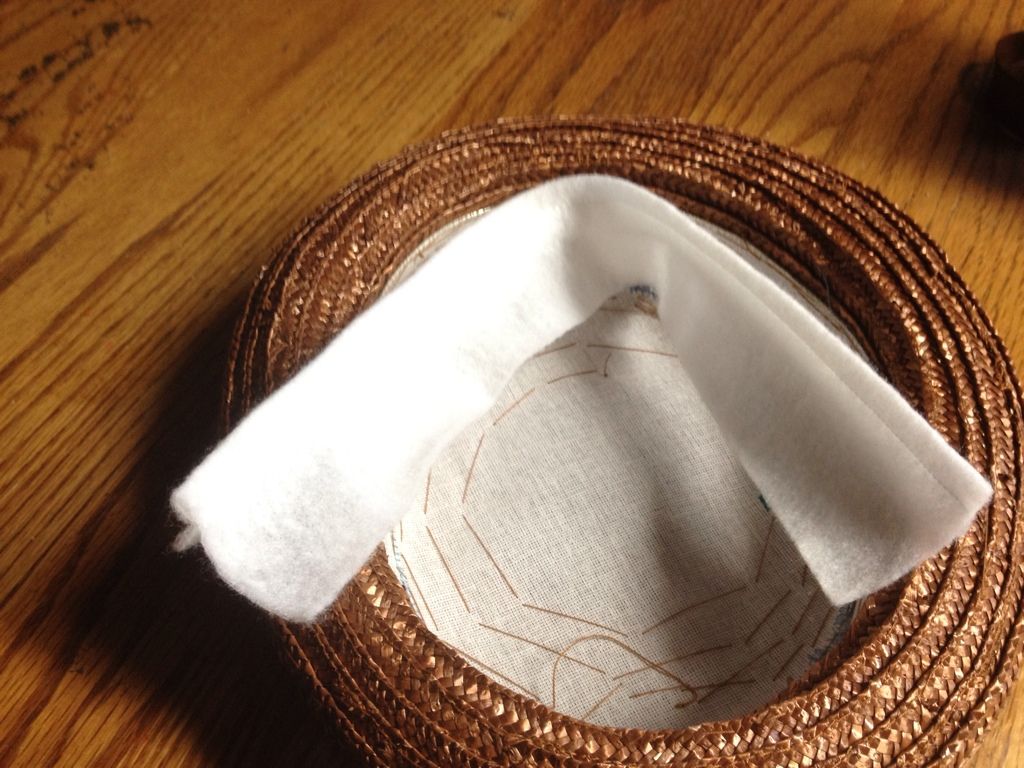
That is a pre-made tailoring sleeve head. It's like quilt batting. I got a sack of them from the tailoring supply house. I tucked it up under the fold before I pinned in the lining to soften the hat where it sits on the head. I pull it over the edge just a little bit as I sew the lining in.
This style of hat in the 1870s fashion plates is worn very forward on the head and the padding keeps the hat from digging into the forehead and leaving a big red dent. :-O
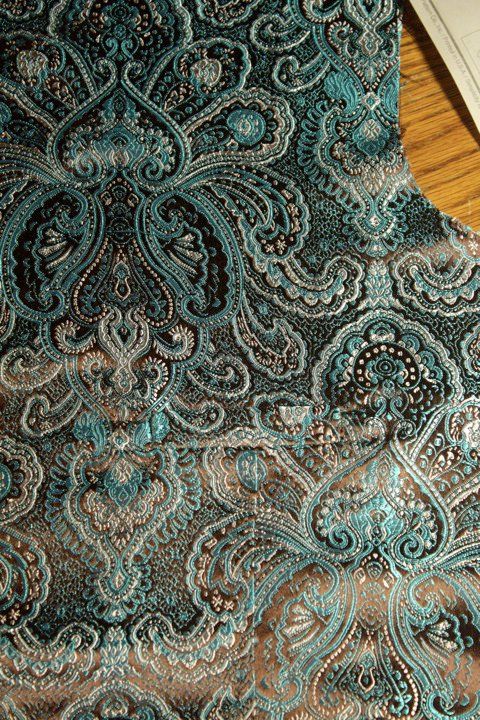
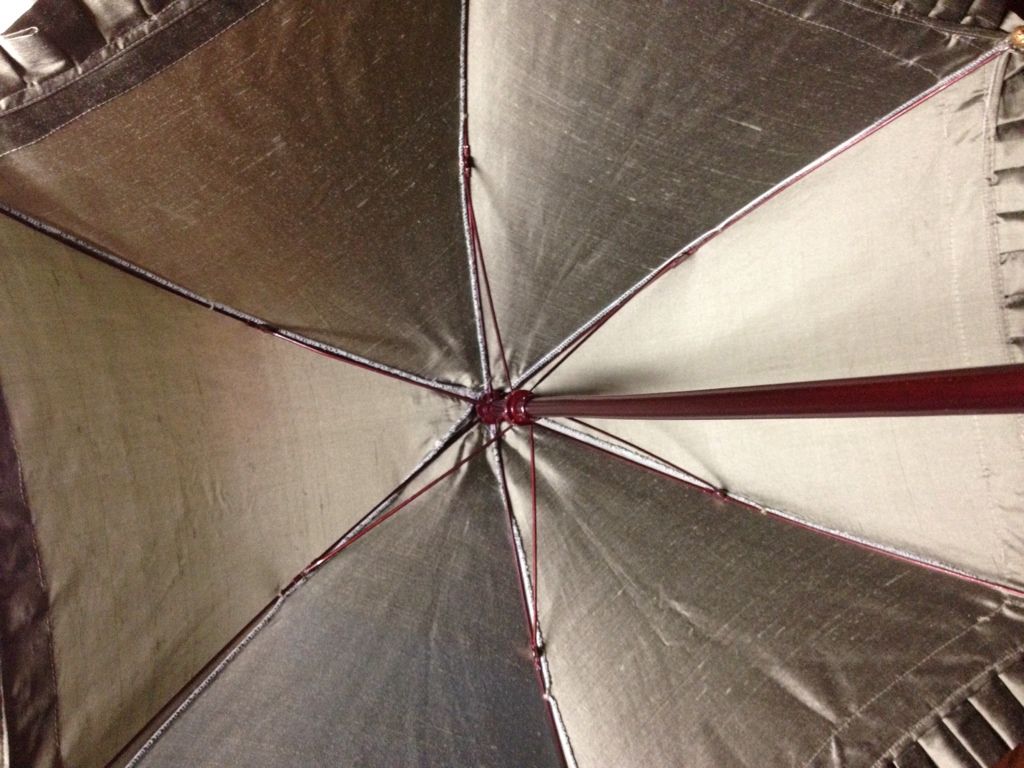
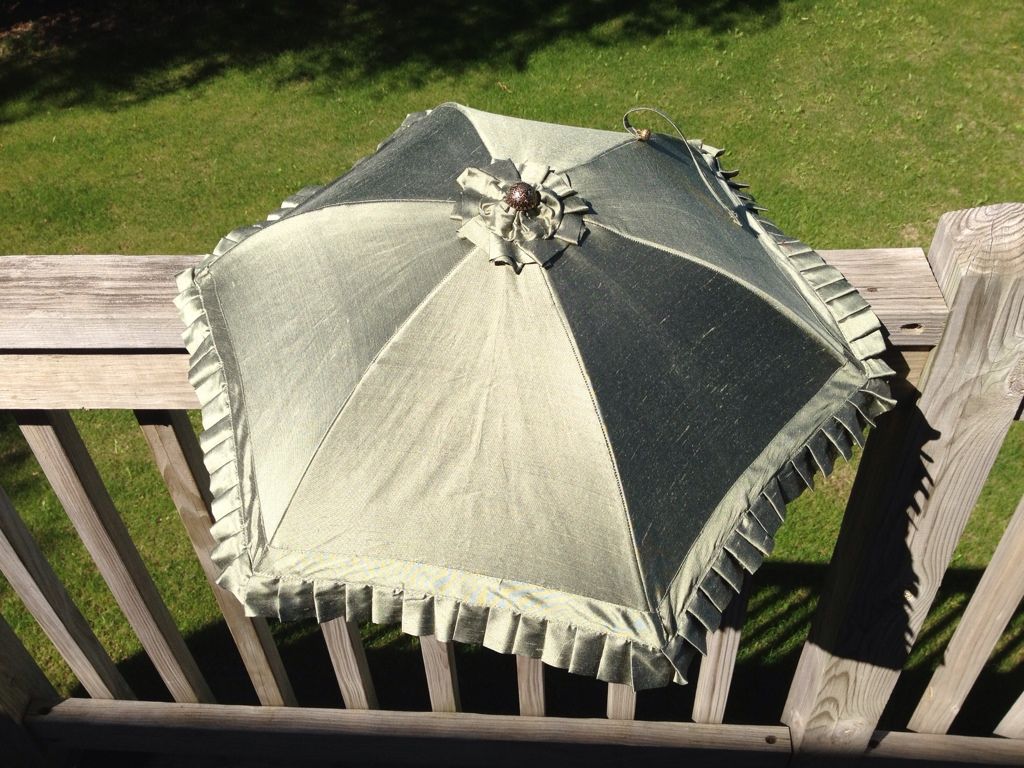
Even if I didn't need distraction from the corded petticoat of doom, I just love parasols. This new one is made of green silk taffeta gotten majorly on sale at Hancock's. Five bucks a yard! Woot! Like most of my fabric, I bought it because I love it. Didn't really have a purpose for it at the time. Have just now realized it's a spot on match for this fabric combo I got a few years ago:
I definitely feel a dress coming on...
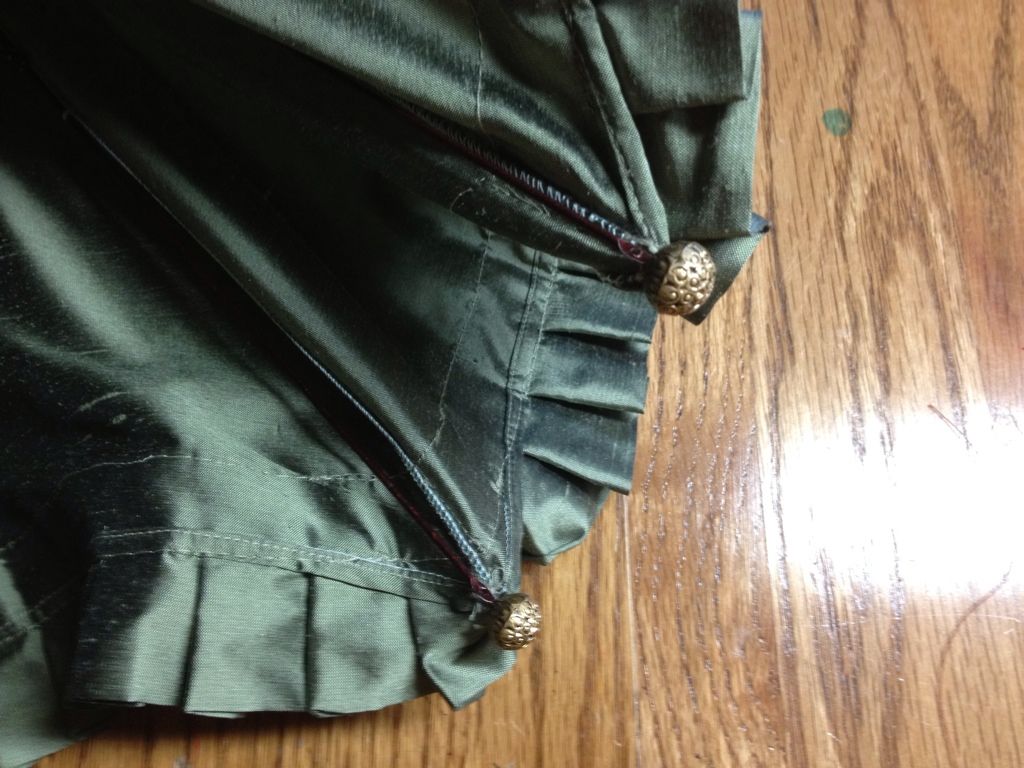
Anyway, on the last parasol post I mentioned that I would try seaming the panels with a serger rolled edge. Not sure that was a great idea. It works as a seam, but without having an absolute thread match I think the seam is so much more visible than a fold-and-stitch seam. You might need to click on the pictures for the larger view to get a better idea of the not quite matching color .
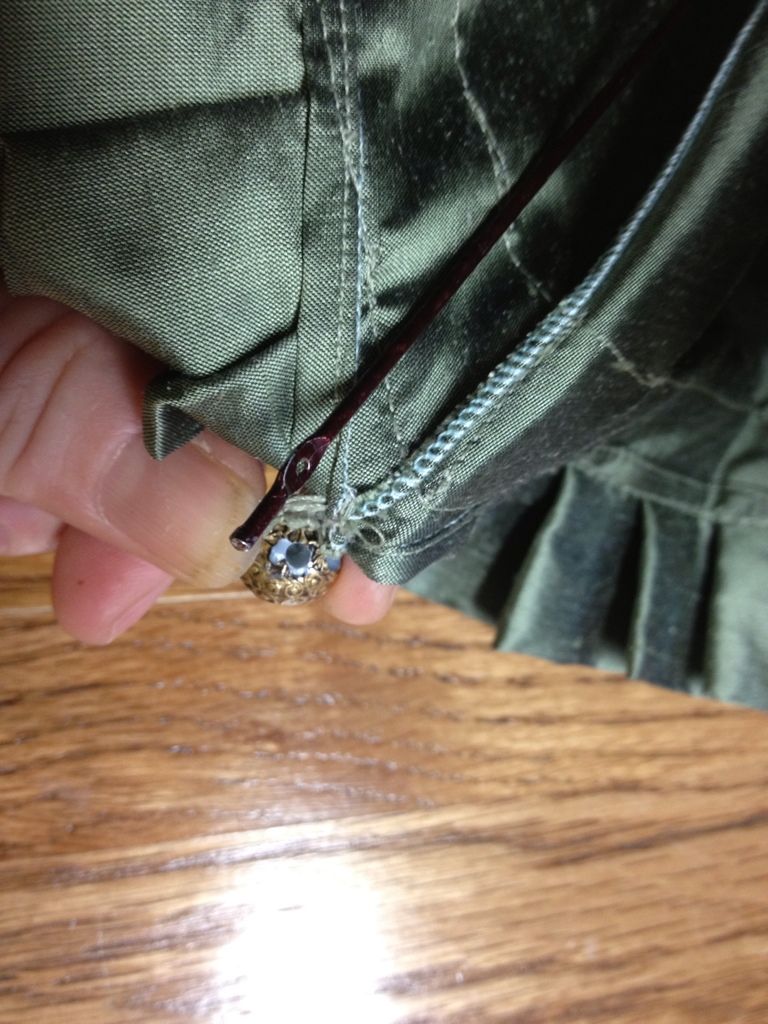
The original parasol was ivory colored so I painted the handle and ribs brown. The rib tip guards I replaced with my favorite button. I use these little guys in so many ways. The button is plastic, so I can cut them, drill into them, modify them however I need to. For this application, I cut off the shanks with scissors and drilled a tiny hole just a bit bigger than the rib end.
You can better see what I mean about the serger thread color here as well.
Then I used the same small drill bit to make a hole across the width of the button so I could sew it to the parasol cover.
Once the button tips are all sewn onto the cover, the tips slide onto the ribs.
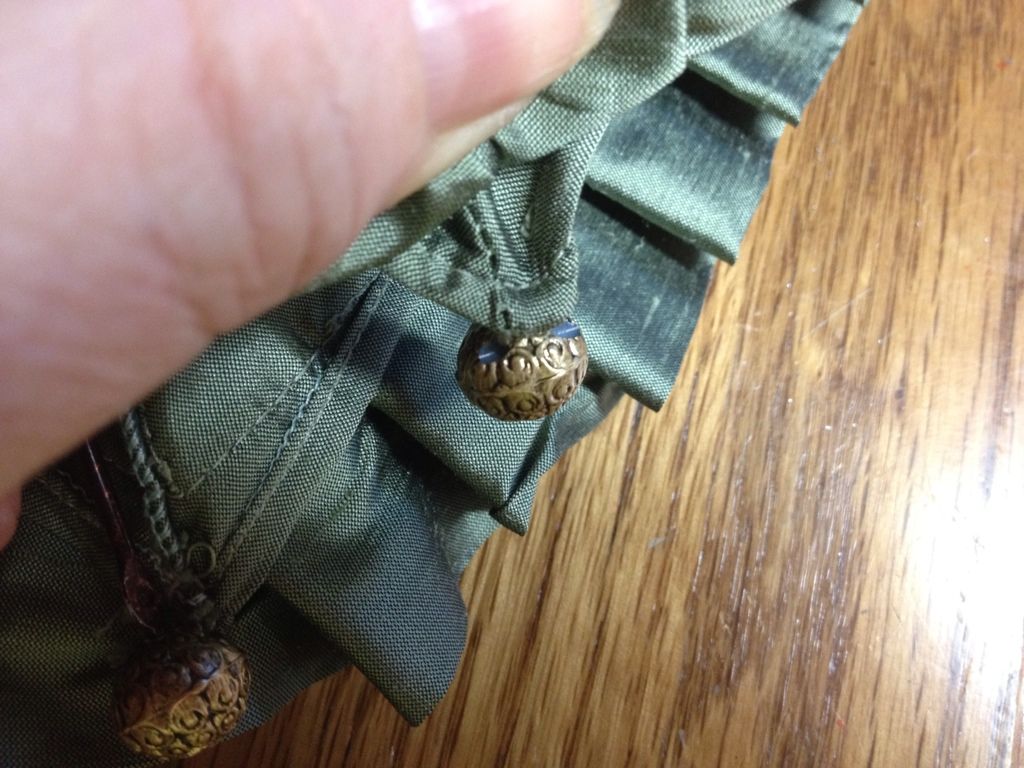
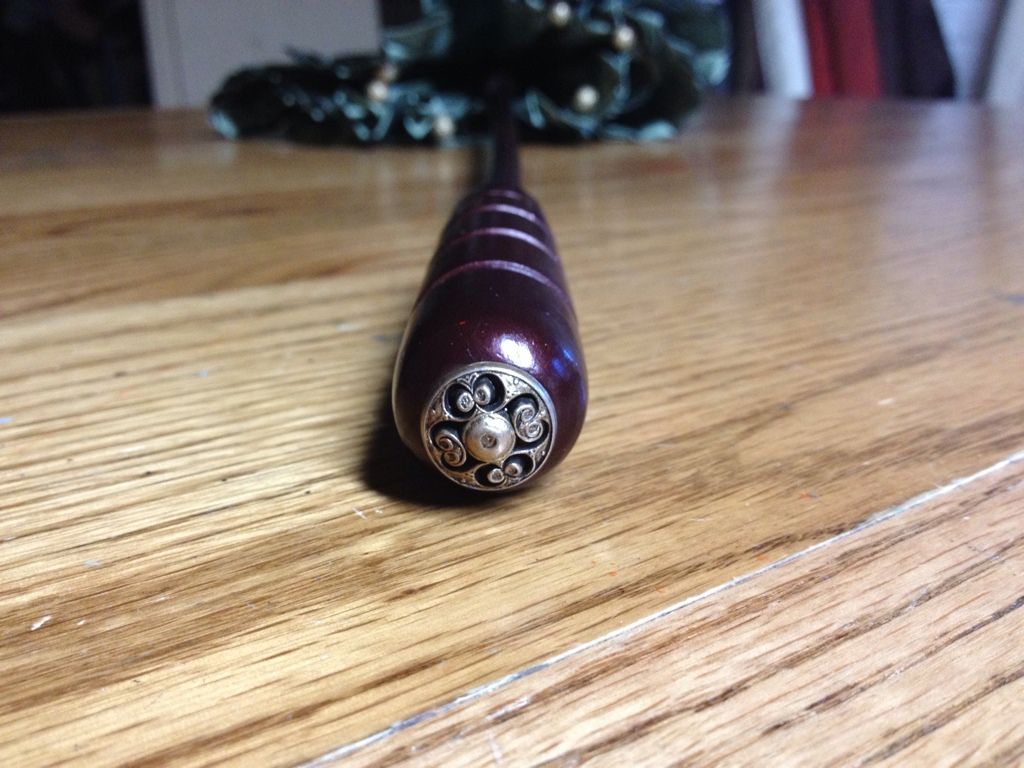
I used a different button to decorate the handle bottom this time.
The finished parasol has a knife pleated ruffle and bias band trim.